
Email overload is one of the most consistent productivity complaints in modern workplaces. The average knowledge worker spends 15 to 20 hours per week in meetings, and a significant portion of the remaining time goes to managing email — sorting, reading, drafting replies, and flagging follow-ups. AI email triage attacks this directly by handling the categorization and drafting work that does not require human judgment.
This guide covers how to build a multi-agent email triage workflow that classifies incoming messages, generates context-aware draft replies, and routes sensitive items to a human for review.
How AI Email Triage Works
A basic AI email triage system uses three coordinated agents:
Agent 1 — The Classifier reads each incoming email, categorizes it by type and priority, and tags it accordingly. Common categories include urgent, sales inquiry, internal request, newsletter or automated notification, and spam or low priority.
Agent 2 — The Draft Responder generates a context-aware reply for emails that warrant a response. It reads the original email, your inbox context, and any relevant knowledge base articles to produce a draft that sounds like you wrote it.
Agent 3 — The Approval Gate reviews the generated draft and routes it appropriately. Routine replies go directly to the sent folder or get scheduled for sending. Sensitive emails — those involving pricing negotiations, complaints, or confidential information — get flagged for human review before anything goes out.
This three-layer structure means AI handles the volume work, while humans stay in control of anything that matters.
What You Need to Build It
Email Integration
You need API access to your email provider. Gmail API allows read and send access through a Google Cloud project with the right OAuth scopes. Microsoft Graph API provides equivalent access for Outlook and Microsoft 365 accounts. Both require setting up OAuth credentials and getting user authorization, which is a one-time setup step.
AI Draft Generation
For drafting, you need an LLM that can generate contextually appropriate email responses. GPT-4o and Claude Sonnet are both well-suited for this — they understand tone, can reference uploaded documents, and produce natural-sounding email language.
The key is providing enough context: the original email, relevant previous exchanges, any knowledge base articles about your product or service, and instructions about your preferred tone and style.
Workflow Automation
An orchestration layer coordinates the flow between email, AI processing, and actions. Zapier and Make are the most accessible options for non-developers — they connect Gmail or Outlook to OpenAI or Anthropic via pre-built integrations, with no code required. For more complex multi-agent workflows, a tool like n8n or a custom Python script using FastAPI gives you more control over the flow and error handling.
Human Approval Step
No automated email system should send responses without a human review gate for certain categories. The approval step does not have to slow you down — a simple Slack notification with “Approve / Edit / Reject” buttons lets you review flagged emails in seconds without opening your email client.
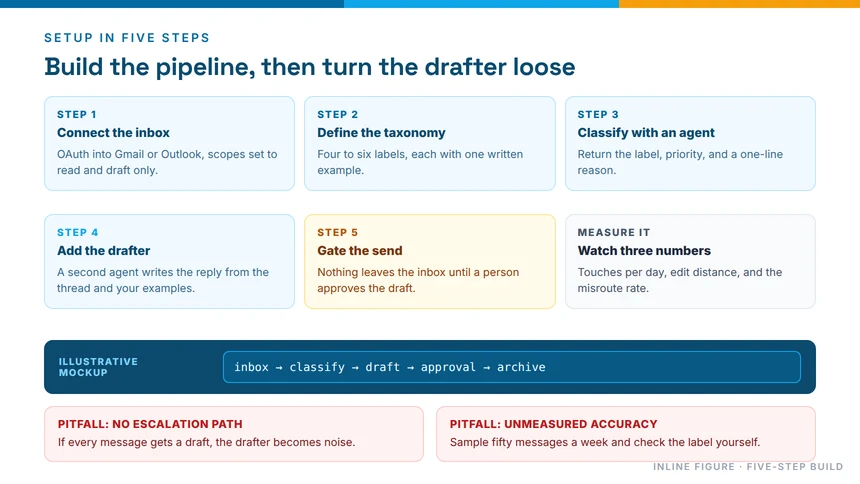
Step-by-Step Setup
Step 1: Configure Email API Access
Set up OAuth credentials for Gmail or Microsoft Graph. This involves creating a Google Cloud project or Azure App Registration, enabling the appropriate email API, and configuring OAuth consent. Most users can follow the official API guides for this step — it typically takes 20 to 40 minutes.
Once authorized, your automation tool can read new emails, extract their content and metadata, and send replies from your address.
Step 2: Define Your Category Taxonomy
Before building the classifier, decide what categories matter for your inbox. A reasonable starting set for a business inbox includes:
Urgent — emails requiring a response within 2 hours. Sales and partnership inquiries — cold outreach, partnership proposals, vendor requests. Internal team messages — Slack cross-posts, meeting invites, project updates. Customer support — bug reports, feature requests, account issues. Newsletters and notifications — automated digests, system alerts, subscriptions. Spam and low priority — marketing mass emails, irrelevant notifications.
The classifier prompt tells the AI what to look for. A well-designed prompt lists each category with two to three concrete examples. More categories are not always better — start with five to seven and expand only when you find genuinely useful distinctions.
Step 3: Build the Classifier Agent
The classifier is a simple prompt to your LLM: “Read the following email and classify it as one of: [category list]. Also rate the urgency from 1 to 5 and identify the sender type: prospect, customer, partner, internal, or other.”
The classifier output feeds into the routing logic. Urgent emails route to a real-time Slack alert. Sales inquiries route to the draft responder. Newsletters route to a folder or get marked read automatically.
Step 4: Build the Draft Responder
For non-urgent emails that warrant a response, the draft responder reads the original email and generates a reply. A good prompt for the drafting agent includes the original email text, any relevant context documents, your name and role, your preferred tone (formal, friendly, concise), and specific instructions about what the reply should accomplish.
The draft appears in your inbox or a review queue. You read it, make any adjustments, and send it. The goal is not a perfect email — it is a usable first draft that saves you 5 to 10 minutes of writing time per email.
Step 5: Add the Approval Gate
The approval gate is a conditional step that routes certain emails differently based on their classification. A practical rule set:
Emails classified as urgent go to a real-time Slack notification with a 30-minute response deadline. Replies to sales inquiries and customer support go to a review queue where you approve, edit, or discard. Routine internal replies go directly to the sent folder on your behalf. Anything flagged as containing sensitive keywords — price, contract, legal, cancel — gets held for human review.
This structure handles 80% of volume automatically while keeping you in control of anything that affects relationships or revenue.
Measuring the Impact
Track three numbers before and after implementing the workflow.
Time spent on email per day. Set a timer for a full work week before deploying the workflow, then measure again after 30 days.
Response rate for different email categories. If the classifier is routing sales inquiries to a review queue, measure how many get a response versus how many sat unanswered before.
Draft approval rate. If you are approving 90% of AI drafts without edits, the workflow is calibrated correctly. If you are editing most drafts heavily, the drafting prompt needs refinement.
Common Pitfalls
No approval gate on customer-facing emails. Sending AI-generated replies without review is the fastest way to create embarrassing or harmful situations. Always keep a human in the loop for external communications, at least initially.
Poor context in drafting prompts. A drafting agent without access to relevant background will generate generic replies that miss important details. Give it your product documentation, pricing information, and examples of good past replies.
Over-classification. Starting with 20 categories sounds thorough but makes the classifier unreliable and the workflow unmanageable. Five to seven well-defined categories outperform a granular taxonomy that nobody can maintain.
Ignoring the classifier’s confidence score. If your LLM classifies an email as “unknown” or shows low confidence, route it for human review instead of forcing a classification.
Getting Started
You do not need to build the full three-agent system on day one. Start with the classifier only: read new emails, categorize them, and route them into folders or Slack notifications. This alone saves significant time by giving you a prioritized inbox instead of a chronological one.
Add the drafting agent once the classifier is working reliably. Add the approval gate once you trust the drafting quality. Each layer builds on the previous one, and tuning each component is easier when you add complexity gradually.